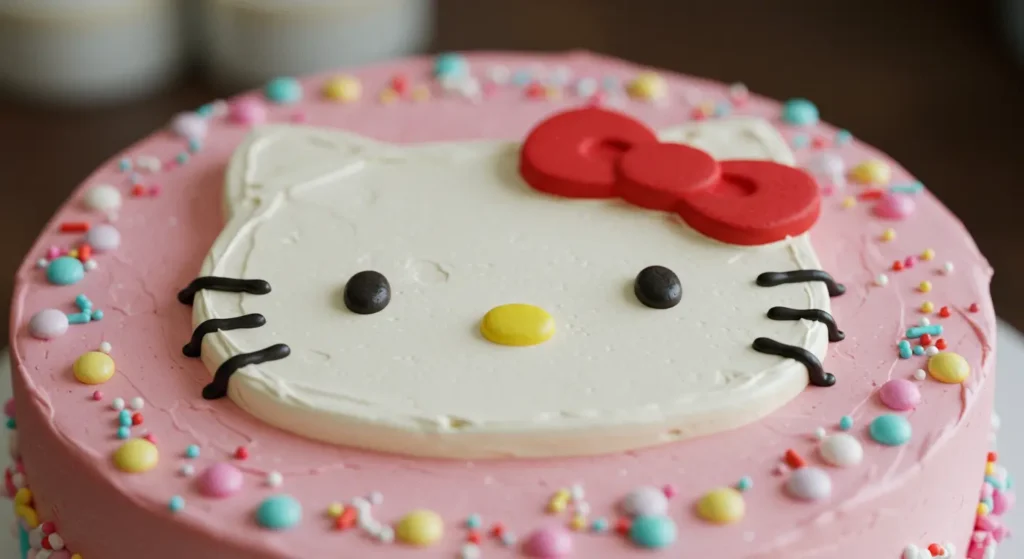
Planning a birthday party for a little one who adores Hello Kitty? Look no further than these delightful Hello Kitty cake designs to make the celebration extra special! Whether you’re crafting a whimsical Hello Kitty birthday cake or simply want to bring the charm of this iconic character to life, these ideas are sure to delight kids and adults alike.
What makes a Hello Kitty cake so special is its versatility. From simple sheet cakes to elaborate tiered masterpieces, there’s a design to suit every skill level and occasion. With endless possibilities for creativity—like using a Hello Kitty cake topper or incorporating playful decorations—you can create a cake that’s as unique as the birthday child. Best of all, these Hello Kitty cake ideas are designed to inspire fun while keeping things stress-free.
Whether you’re baking for a toddler’s party, a themed celebration, or just because, these Hello Kitty cakes are guaranteed to be the centerpiece of any event. Ready to create a cake that’s as cute as it is delicious? Let’s dive in!
Quick Recipe Card
Prep Time: 30 minutes
Cook Time: 30-35 minutes
Total Time: 1 hour (plus decorating time)
Difficulty: Easy to Intermediate
Servings: 8-12 slices
Nutritional Information (per slice):
Calories: 300 | Fat: 12g | Carbs: 45g | Sugar: 30g | Protein: 4g
Key Equipment:
- Mixing bowls
- Whisk and spatula
- 9-inch round or square cake pans (2)
- Offset spatula or butter knife
- Piping bags and tips (optional, for decorations)
Ingredients:
- For the Cake:
- 1 box vanilla or white cake mix (or homemade equivalent)
- 3 large eggs
- ½ cup vegetable oil
- 1 cup whole milk
- 1 tsp vanilla extract
- For the Frosting:
- 1 batch vanilla buttercream frosting (store-bought or homemade)
- Pink, white, and black gel food coloring
- For Decorations:
- Hello Kitty cake topper (store-bought or DIY with printable images)
- Sprinkles in pink, white, and gold
- Optional: fondant, candy eyes, or edible markers

This quick guide ensures you can whip up a Hello Kitty birthday cake effortlessly. With these simple ingredients, you’re ready to bake one of the most adorable Hello Kitty cakes around!
Step-by-Step Instructions
Baking a Hello Kitty cake is as easy as mixing, baking, and decorating. Follow these five simple steps to create a cake that’s cute, fun, and full of personality—just like Hello Kitty herself!
Step 1: Preheat and Prepare
Preheat your oven to 350°F (175°C) and grease two 9-inch round or square cake pans. Line the bottoms with parchment paper to ensure the cakes release easily after baking. If you’re aiming for an authentic Hello Kitty birthday cake , take a moment to gather all your decorating supplies—like food coloring, fondant, and your Hello Kitty cake topper —so everything is ready to go.
Step 2: Make the Cake Batter
In a large mixing bowl, combine the cake mix, eggs, vegetable oil, milk, and vanilla extract. Whisk until smooth and free of lumps. Divide the batter evenly between the prepared pans and spread it out with a spatula. For a fun twist, tint one batch of batter pink using gel food coloring to create a colorful layer inside the cake.
Step 3: Bake the Cakes
Bake the cakes for 30-35 minutes, or until a toothpick inserted into the center comes out clean. Allow the cakes to cool in the pans for 10 minutes before transferring them to a wire rack to cool completely. For a layered effect, stack the colored layers or marble them together for a whimsical touch.
Step 4: Frost and Decorate
Once the cakes are cooled, use a serrated knife to level the tops if needed. Place one layer on a serving plate and spread a thin layer of vanilla buttercream frosting on top. Add the second layer and frost the entire cake with a smooth, even layer of frosting. Use additional frosting and piping bags to create Hello Kitty’s iconic features, such as her bow, whiskers, and eyes. Tint small portions of frosting with pink and black gel food coloring for detailing.
Step 5: Add the Finishing Touches
Place your Hello Kitty cake topper in the center of the cake for a show-stopping focal point. You can also use fondant to craft 3D shapes like bows or ears, or draw details directly onto the cake with edible markers. Sprinkle pink, white, and gold sprinkles around the edges for extra flair. Serve your Hello Kitty cake at the party and watch the smiles light up the room!
Expert Tips & Troubleshooting

Baking a Hello Kitty cake is simple, but these expert tips will help you avoid common pitfalls and elevate your creation to the next level.
Professional Baker Insights:
- Use Gel Food Coloring: Gel food coloring provides vibrant, bold hues without altering the texture of your frosting. Liquid food coloring can dilute the frosting and result in less intense colors.
- Level Your Cakes: Use a serrated knife or cake leveler to trim the tops of your cakes for an even surface. This ensures smooth layering and prevents the cake from leaning.
- DIY Cake Topper: If you can’t find a store-bought Hello Kitty cake topper , print out a high-quality image of Hello Kitty, attach it to a skewer or straw, and secure it to the cake. It’s an easy and budget-friendly solution.
Troubleshooting Common Issues:
- Cake Layers Sticking to the Pan: Always grease your pans thoroughly and line them with parchment paper. If the cakes still stick, let them cool completely before gently running a knife around the edges.
- Frosting Too Thin: If your frosting is too runny, chill it in the refrigerator for 15-20 minutes to firm up. Avoid overmixing once powdered sugar is added, as this can make the frosting too soft.
- Colors Bleeding into Frosting: To prevent colored layers from bleeding into the frosting, chill the cakes for 15-20 minutes after baking and before assembling. This helps set the crumb and keeps colors contained.
Make-Ahead Instructions:
You can bake the cake layers up to 2 days in advance and store them in an airtight container at room temperature. Alternatively, freeze the cooled layers for up to 1 month—just thaw them in the refrigerator overnight before decorating.
Storage Guidelines:
Store the finished Hello Kitty birthday cake in the refrigerator, covered with a cake dome or plastic wrap, for up to 3 days. Bring it to room temperature before serving for the best flavor and texture.
With these tips, you’ll master the art of making a colorful and festive Hello Kitty cake like a pro!
Variations & Customizations
One of the best things about this Hello Kitty cake is its versatility. Whether you’re catering to dietary restrictions or looking to add a personal touch, these customizations will keep your creation exciting and unique.
Seasonal Adaptations:
- Spring/Summer: Add fresh flowers (edible or non-edible) around the base of the cake for a vibrant, garden-inspired look.
- Fall/Winter: Use warm tones like orange and red in the frosting or decorations to match autumn leaves or holiday themes.
Dietary Modifications:
- Gluten-Free Option: Substitute the cake mix with a gluten-free alternative and ensure all other ingredients (like sprinkles) are certified gluten-free. This ensures your Hello Kitty birthday cake is safe for those with gluten sensitivities.
- Dairy-Free Option: Use dairy-free butter and milk alternatives for both the cake and frosting. These swaps make this recipe completely plant-based without sacrificing flavor.
Flavor Variations:
- Chocolate Lovers’ Twist: Swap the vanilla cake mix for chocolate or marble the batter with cocoa powder for a rich, indulgent treat.
- Fruity Fun: Add a layer of fruit filling (like strawberry or raspberry jam) between the cake layers for a burst of fruity flavor.
- Citrus Zing: Incorporate lemon or orange zest into the batter for a refreshing twist that pairs beautifully with the colorful theme.
Decoration Ideas:
- Use fondant to create 3D shapes like Hello Kitty’s ears, bow, or whiskers for an extra-special touch.
- Pipe clouds, stars, or paw prints onto the cake using colored frosting for a whimsical design.
- Serve slices with a side of sprinkles or edible glitter so guests can customize their own pieces.
With these variations, your Hello Kitty cake ideas can suit any occasion, season, or dietary need—ensuring there’s something for everyone to enjoy!
Serving & Presentation

The way you serve and present your Hello Kitty cake can transform it from a simple dessert into the star of the party. Whether you’re enjoying it at home or bringing it to a gathering, here are some creative ideas to make it shine.
Plating Suggestions:
- Slice with Precision: Use a sharp knife dipped in hot water to cleanly cut through the cake. Wipe the blade between slices for picture-perfect results.
- Individual Servings: For smaller gatherings, consider baking cupcakes instead of a layered cake. Decorate each cupcake with Hello Kitty-themed designs using frosting, sprinkles, and mini toppers.
- Layered Parfaits: Crumble the cake into clear glasses and layer it with whipped cream or frosting for a deconstructed Hello Kitty cake parfait.
Accompaniment Recommendations:
- Pair the cake with a cold glass of milk, juice, or sparkling lemonade for a refreshing treat.
- Serve it alongside a scoop of vanilla or strawberry ice cream for an indulgent “cake à la mode” option.
- Offer a selection of toppings—like extra sprinkles, candy eyes, or edible markers—at the table so kids can personalize their slices.
Special Occasion Presentations:
- Birthday Bash Highlight: Place the cake on a colorful cake stand surrounded by balloons, streamers, and other Hello Kitty-themed decorations to create a festive centerpiece.
- Gift Idea: Package leftover slices in decorative boxes or jars tied with ribbon for party favors. Include a handwritten note with decorating tips for a personal touch.
- Photo Op Setup: Create a themed backdrop with Hello Kitty characters, bows, and clouds for a fun photo opportunity with the cake as the star.
No matter how you choose to serve it, this Hello Kitty cake is sure to be a crowd-pleaser. Its vibrant colors, playful decorations, and endless customization options make it a versatile addition to any setting.
Conclusion
There you have it—the ultimate guide to baking an adorable Hello Kitty cake , a fun and festive treat that’s perfect for any celebration. With its vibrant colors, playful decorations, and endless customization options, this cake is sure to bring joy to kids and adults alike. Whether you’re crafting a Hello Kitty birthday cake for a special occasion or simply want to delight your little ones, these ideas are as simple as they are delightful.
What makes a Hello Kitty cake so special is its versatility. From colorful frostings to creative Hello Kitty cake ideas , this dessert invites you to unleash your creativity while keeping things stress-free. Best of all, it’s easy enough for bakers of all skill levels to master. So grab your ingredients, preheat that oven, and get ready to bake a cake that will have everyone smiling from ear to ear.
Happy baking, and may every slice bring laughter and joy to your celebration—just like Hello Kitty herself!
FAQ Section
1. Can I use store-bought frosting instead of homemade?
Yes, you can absolutely use store-bought frosting for convenience. Simply divide it into bowls and tint with gel food coloring to match your Hello Kitty cake ideas .
2. What can I substitute for gel food coloring?
If you don’t have gel food coloring, liquid food coloring can work in a pinch, but keep in mind that it may alter the texture of your frosting. Use less liquid to avoid thinning the frosting too much.
3. Why is my cake too dry?
Dry cake often results from overbaking or using too little oil. Ensure you don’t bake it beyond the recommended time, and measure your ingredients carefully.
4. Can I freeze the cake?
Absolutely! You can freeze the baked cake layers (wrapped tightly in plastic wrap and foil) for up to 1 month. Thaw at room temperature before decorating.
5. How do I store leftovers?
Store the finished cake in the refrigerator, covered with a cake dome or plastic wrap, for up to 3 days. Bring it to room temperature before serving for the best flavor and texture.
6. Can I make this cake gluten-free?
Yes! Substitute the cake mix with a gluten-free alternative and ensure all other ingredients (like sprinkles) are certified gluten-free. This ensures your Hello Kitty birthday cake is safe for those with gluten sensitivities.
7. What decorations pair well with this cake?
This Hello Kitty cake pairs beautifully with themed toppers, candy eyes, fondant shapes, or edible markers. Sprinkles in pink, white, and gold add extra flair and tie the design together.