Table of Contents
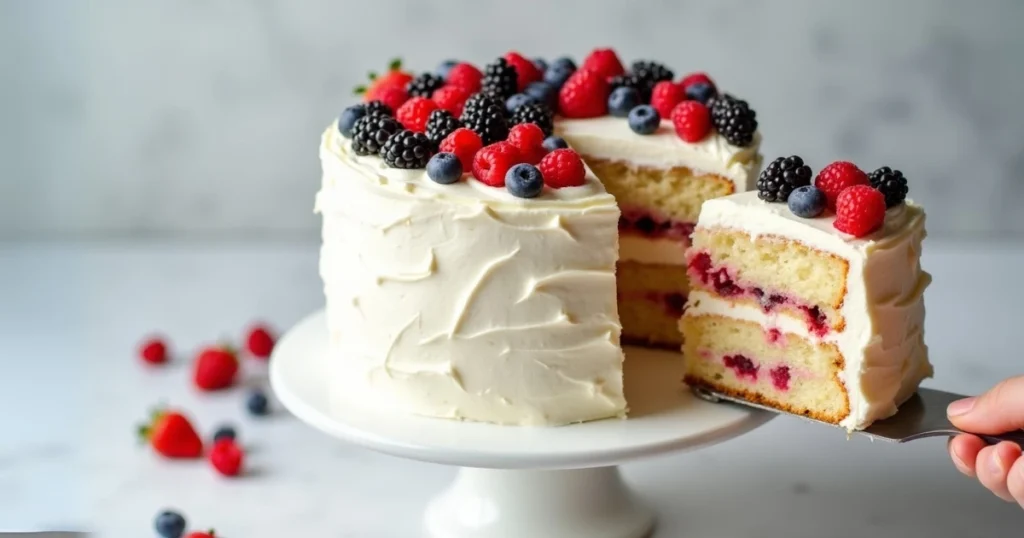
Imagine sinking your fork into a luscious slice of cake, the delicate crumb yielding to the weight of your utensil. As you take a bite, the creamy, cloud-like frosting melts on your tongue, its sweetness perfectly balanced by the tart berries nestled between the tender layers. This is the Berry Chantilly Cake – a captivating fusion of classic elegance and vibrant, fruity flavor.
As a self-proclaimed baking enthusiast, I’ve long been enamored with the timeless charm of chantilly cakes. There’s just something so alluring about their light, airy texture and delicate floral notes. But when I stumbled upon a recipe that incorporated fresh, juicy berries, I knew I had to give it a try. The result was nothing short of extraordinary – a harmonious blend of familiar comfort and unexpected delight.
The origins of the chantilly cake can be traced back to 19th-century France, where the creation of this delicate dessert was credited to the renowned Parisian pastry chef Antoine Carême. The name “chantilly” was a nod to the whipped cream that adorned the cake, a signature element that would become a hallmark of the recipe. Over time, chantilly cakes have evolved, with bakers around the world putting their own creative spin on this classic confection.
In the case of the Berry Chantilly Cake, the introduction of vibrant, juicy berries not only adds a delightful burst of flavor but also elevates the visual appeal of the dessert. The vibrant pops of color amidst the pristine white frosting create a truly captivating presentation that is sure to impress your guests. But beyond its aesthetic charm, this recipe offers a harmonious balance of textures and flavors that will delight your senses.
As you sink your fork into the first fluffy layer, the gentle crumb gives way to the luscious berry filling, each bite a symphony of sweetness and tartness. The chantilly frosting, light and airy, provides a creamy counterpoint that perfectly complements the fresh fruit. And with the option to customize the berry selection to suit your taste buds, this recipe offers a versatile and adaptable treat that can be enjoyed year-round.
Whether you’re a seasoned baker or a novice in the kitchen, the Berry Chantilly Cake is a rewarding project that will fill your home with the enticing aroma of freshly baked goodness. So, let’s dive in and explore the step-by-step process of creating this delightful masterpiece.
Quick Recipe Card: Berry Chantilly Cake Essential Guide
This berry chantilly cake recipe serves 8-10 people and takes approximately 2 hours to complete, including cooling time.
- Prep Time: 30 minutes
- Cook Time: 30 minutes
- Total Time: 1 hour
- Difficulty: Intermediate Servings: 8-10
Nutritional Information (per serving):
- Calories: 420
- Fat: 20g
- Carbohydrates: 54g
- Protein: 5g
- Fiber: 2g
Equipment Needed:
- 3 8-inch cake pans
- Electric mixer
- Offset spatula
- Piping bag and tip (optional)
- Serrated knife
Ingredients:
- 2 cups (250g) all-purpose flour
- 2 teaspoons baking powder
- 1/2 teaspoon salt
- 1 cup (230g) unsalted butter, softened
- 1 1/2 cups (300g) granulated sugar
- 4 large eggs
- 1 teaspoon vanilla extract
- 1 cup (240ml) whole milk
- 2 cups (280g) mixed berries (such as raspberries, blackberries, and blueberries)
- 2 cups (480ml) heavy cream
- 1/4 cup (50g) confectioners’ sugar
Instructions:
- Preheat your oven to 350°F (180°C). Prepare three 8-inch cake pans by greasing and lightly dusting them with flour.
- In a medium bowl, mix the flour, baking powder, and salt, whisking until the ingredients are well incorporated.
- In a large bowl, beat the butter and granulated sugar with an electric mixer until light and fluffy, about 3-5 minutes.
- Add the eggs one at a time, beating thoroughly after each addition to ensure they are fully blended. Stir in the vanilla.
- Gradually alternate between adding the dry flour mixture and the milk to the butter mixture, mixing gently until just combined.
- Gently fold in the mixed berries.
- Divide the batter evenly into the greased and floured pans.
- Bake for 25 to 30 minutes, checking with a toothpick to ensure the cakes are baked through—if it comes out clean, they’re ready.
- Cool the cakes in the pans for about 10 minutes, then carefully move them to a wire rack to finish cooling completely.
Ingredient Deep Dive

To create the perfect berry chantilly cake, selecting the right ingredients is crucial. Professional bakers who regularly make berry chantilly cake recommend investing in high-quality ingredients for the best results. The distinctive texture of a berry chantilly cake comes from the careful balance of these key components.
Berries: The star of the show, the berries in this recipe provide a delightful balance of sweetness and tartness. I’ve opted for a mix of raspberries, blackberries, and blueberries, but you can easily customize the selection to suit your personal preferences or seasonal availability. The juicy berries add a burst of fresh flavor and vibrant color to the cake.
Flour: All-purpose flour provides the structure and crumb for the cake layers. Be sure to measure it accurately, as too much flour can lead to a dense, dry texture, while too little can result in a fragile, crumbly cake.
Butter: Unsalted butter is the foundation for the tender, moist cake layers. Its rich, creamy flavor and ability to trap air bubbles during mixing contribute to the cake’s light, airy texture.
Sugar: Granulated sugar not only sweetens the cake but also helps to create a delicate, tender crumb. The confectioners’ sugar in the frosting adds a silky smooth texture and subtle sweetness to balance the tartness of the berries.
Milk: Whole milk adds moisture and richness to the cake batter, ensuring a soft, tender crumb. You can substitute low-fat or non-fat milk, but the texture may be slightly denser.
Eggs: Large eggs provide structure, stability, and richness to the cake layers. They help to bind the ingredients together and contribute to the cake’s tender, yet sturdy, texture.
Vanilla: A classic flavor enhancer, vanilla extract amplifies the sweetness and depth of the cake.
Heavy whipping cream is the star ingredient that gives chantilly frosting its rich and velvety texture. When whipped, it transforms into a light, airy, and silky smooth topping that complements the fresh berry filling perfectly.
With these carefully chosen ingredients, the Berry Chantilly Cake becomes a harmonious balance of classic elegance and vibrant, fruity flavor.
Equipment Needed
To bring this Berry Chantilly Cake to life, you’ll need a few essential tools that will ensure your berry chantilly cake turns out professionally polished and picture-perfect.
Cake Pans
- Three 8-inch round cake pans are the foundation for this multilayered dessert. Make sure they are well-greased and floured to prevent the cakes from sticking.
Electric Mixer:
- A stand mixer or hand mixer will be your best friend when it comes to whipping the batter and the chantilly frosting to the perfect texture.
Offset Spatula:
- This versatile tool makes it easy to spread the frosting evenly between the cake layers and on the exterior of the cake, ensuring a smooth, professional-looking finish.
Piping Bag and Tip (Optional):
- If you want to get creative with the cake’s decoration, a piping bag and a star or round tip can be used to add intricate swirls or rosettes of chantilly frosting.
Serrated Knife:
- A sharp serrated knife is essential for leveling the cake layers and slicing the cooled cake into even, presentable slices.
With these tools at the ready, you’ll be well on your way to creating a stunning Berry Chantilly Cake that will wow your friends and family.
Step-by-Step Instructions
Following these detailed steps will ensure your berry chantilly cake turns out perfectly. The key to a successful berry chantilly cake lies in the proper layering technique and attention to detail.

- Preheat your oven to 350°F (180°C) and grease and flour three 8-inch round cake pans. This will ensure the cakes release easily from the pans once baked.
- In a medium bowl, combine the all-purpose flour, baking powder, and salt, whisking until evenly blended. Set this dry mixture aside.
- In a large bowl, use an electric mixer to beat the softened unsalted butter and granulated sugar until light and fluffy, about 3-5 minutes. This creaming process incorporates air into the batter, resulting in a tender, moist crumb.
- Add the eggs one at a time, beating thoroughly after each addition to ensure they are fully incorporated and to avoid curdling the batter. Mix in the vanilla extract to enhance the flavor.
- Now it’s time to alternate adding the flour mixture and the whole milk to the butter-sugar mixture, mixing just until incorporated after each addition. Be careful not to overmix, as this can develop gluten and lead to a tough, dense texture.
- Carefully fold in the mixed berries, being gentle to avoid crushing them and ensuring they are evenly dispersed throughout the batter.
- Divide the batter evenly among the prepared cake pans, smoothing the tops with a spatula to ensure even baking.
- Bake the cakes for 25-30 minutes, checking doneness with a toothpick—it should come out clean when ready. Once baked, allow the cakes to sit in their pans for 10 minutes before carefully transferring them onto a wire rack to cool completely.
- Once the cake layers are completely cooled, use a sharp serrated knife to level the tops, ensuring a flat surface for stacking.
Expert Tips and Tricks
Master bakers share their secrets for the perfect berry chantilly cake in this comprehensive guide. Understanding common berry chantilly cake mistakes to avoid can help ensure your success. When working with a classic berry chantilly cake recipe, these professional insights make all the difference.
Chill the Cake Layers:
Before assembling the cake, chill the cooled cake layers in the refrigerator for at least 30 minutes. This will firm up the crumb and make the layers easier to handle when stacking.
Frost the Cake Chilled:
Similarly, frost the cake when both the layers and the frosting are thoroughly chilled. This will help the frosting hold its shape and create a smooth, even finish.
Use Fresh, Ripe Berries:
For the best flavor and texture, opt for fresh, juicy berries at the peak of their season. Avoid overripe or mushy berries, as they can make the filling soggy.
Adjust Sweetness:
Depending on the sweetness of your berries, you may want to adjust the amount of confectioners’ sugar in the chantilly frosting. Start with the recommended amount and taste as you go, adding more sugar if needed.
Make-Ahead Instructions:
The cake layers can be baked and frozen up to one month in advance. Before assembling the cake, allow them to thaw at room temperature if previously frozen.
The assembled, frosted cake can also be made up to three days ahead and stored in the refrigerator.
Storage Guidelines:
Keep the finished Berry Chantilly Cake refrigerated, covered, for up to five days. The cake can also be frozen for up to two months, though the texture of the frosting may change slightly upon thawing.
By following these expert tips, you’ll be well on your way to creating a Berry Chantilly Cake that’s not only visually stunning but also consistently delicious.
Variations and Customizations
While the classic berry chantilly cake is already perfect, there are several ways to make it your own. Each seasonal variation of the berry chantilly cake brings its own charm and unique flavor profile. Modern interpretations of the berry chantilly cake demonstrate its versatility as a dessert.

Seasonal Adaptations:
Swap out the mixed berries for a variety that aligns with the current season. In the spring, try a combination of strawberries, raspberries, and blueberries. For the summer, blackberries and marionberries would be a delightful choice. And in the fall, try a mix of cranberries, apples, and pears.
Dietary Modifications:
To create a gluten-free version of the Berry Chantilly Cake, simply substitute the all-purpose flour with a high-quality gluten-free flour blend. For a vegan twist, use plant-based milk and cream alternatives, and replace the eggs with a flax or chia egg substitute.
Flavor Variations:
If you’re feeling adventurous, try infusing the cake layers with citrus zest, such as lemon or orange. You could also experiment with swirling in a dollop of your favorite fruit preserves or compote into the berry filling.
Decoration Ideas:
Elevate the visual appeal of your Berry Chantilly Cake by piping rosettes or swirls of the chantilly frosting around the edges. You can also garnish the top with fresh whole berries, edible flowers, or a light dusting of confectioners’ sugar.
With these creative customizations, you can tailor the Berry Chantilly Cake to suit any occasion or personal preference, making it a truly versatile and crowd-pleasing dessert.
Serving and Presentation

A properly presented berry chantilly cake makes a stunning centerpiece for any special occasion. The berry chantilly cake pairs beautifully with a variety of beverages and accompaniments. For the most impressive presentation, your berry chantilly cake should be served at the perfect temperature.
Plating Suggestions:
For a classic and elegant look, slice the cake and arrange the individual portions on dessert plates. Garnish each slice with a few fresh berries, a sprig of mint, or a light dusting of confectioners’ sugar.
Accompaniment Recommendations:
The Berry Chantilly Cake pairs beautifully with a scoop of fresh whipped cream, a drizzle of fruit coulis, or a side of lightly sweetened macerated berries. These accompaniments help to enhance the cake’s fruity flavor and creamy texture.
Special Occasion Presentations:
For a more impressive display, consider serving the Berry Chantilly Cake as the centerpiece of a dessert table or buffet. You can present the entire cake on a decorative platter or cake stand, surrounded by complementary treats like mini tarts, truffles, or cookies.
Photography Tips:
Capture the beauty of your creation by snapping high-quality photos for social media or personal keepsakes. Use natural lighting, a clean background, and try different angles to showcase the cake’s layers, textures, and vibrant colors.
Whether you’re enjoying a slice as a weekend indulgence or serving it as the grand finale to a special gathering, the Berry Chantilly Cake is sure to delight the senses and leave your guests with an unforgettable experience.
Pairing Suggestions
The Berry Chantilly Cake is a versatile dessert that can be enjoyed on its own or paired with a variety of complementary beverages and accompaniments. Here are some delightful pairing suggestions:
Coffee or Tea:
- The light, airy texture of the chantilly frosting and the bright, fruity notes of the berries make the Berry Chantilly Cake a perfect companion to a rich, full-bodied coffee or a delicate, fragrant tea.
Sparkling Wine:
- The festive bubbles of a dry, crisp sparkling wine, such as Prosecco or Champagne, can provide a refreshing contrast to the sweetness of the cake.
Dessert Wine:
- For a decadent after-dinner treat, pair a slice of the Berry Chantilly Cake with a sweet, fruity dessert wine, like a late-harvest Riesling or a Muscat.
Conclusion
The Berry Chantilly Cake is a symphony of flavors and textures, a delightful fusion of classic elegance and vibrant, fruity delight. Whether you’re an experienced baker or just starting out, this recipe is guaranteed to wow and bring joy to everyone who tastes it.
So, what are you waiting for? Gather your ingredients, fire up your ovens, and get ready to create a showstopping dessert that will have your family and friends swooning. Remember to snap some mouthwatering photos and share your creations on social media, tagging #BerryChantillyCake to inspire others to give this recipe a try.
Indulge in the delicate, cloud-like frosting, savor the burst of juicy berries, and experience the pure joy of every bite. The Berry Chantilly Cake is a testament to the power of simple, high-quality ingredients and the artistry of baking. So, let’s get started on crafting a dessert that will leave a lasting impression on all who taste it.
FAQ Section
Q: Can I use frozen berries in my berry chantilly cake?
A: While fresh berries are ideal for the best berry chantilly cake results, you can use frozen berries if necessary. Be sure to thaw them completely and drain well before use. Pat them dry with paper towels to prevent excess moisture from affecting the cake’s texture.
Q: How far in advance can I make this cake?
A: The berry chantilly cake can be made up to two days ahead and stored in the refrigerator. You can also prepare the components separately: cake layers can be baked and frozen for up to a month, and the frosting can be made 24 hours in advance.
Q: What’s the best way to transport a berry chantilly cake?
A: Transport your berry chantilly cake in a sturdy cake carrier, preferably with a locking mechanism. Keep it refrigerated until just before transport, and avoid leaving it in a warm car. Place a non-slip mat under the cake board to prevent sliding.
Q: Why did my frosting become runny?
A: Several factors can cause runny frosting in a berry chantilly cake:
- Ingredients too warm (mascarpone and cream should be cold)
- Overwhipped cream
- Too much sugar
- Excess moisture from berries To prevent this, keep all ingredients cold and work in a cool environment.


