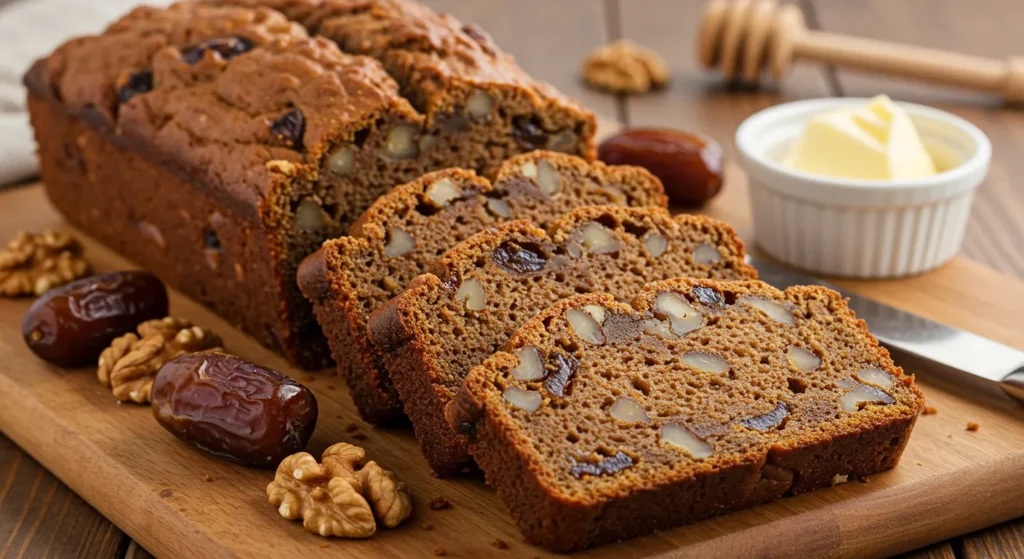
Imagine the warm, inviting aroma of freshly baked date bread filling your kitchen—a rich, nutty scent with caramel undertones that instantly makes you feel at home. This date bread recipe is a true delight, offering a moist, tender crumb with the perfect balance of natural sweetness from dates and a satisfying crunch from nuts. Whether you’re a seasoned baker or a beginner, this recipe guarantees a foolproof, flavorful loaf every time.
Growing up, date nut bread was a cherished family tradition, especially during the colder months. My grandmother always had a loaf ready, its deep, molasses-kissed flavors making it a staple at breakfast tables and afternoon tea. While modern variations abound, this date and nut bread recipe stays true to its roots—simple, wholesome, and utterly delicious.
Originating as a classic teatime favorite, date bread has been enjoyed for generations. With natural sweetness from dates and the added depth of nuts, it became a staple in many households. Today, variations like the recipe date nut loaf allow for exciting tweaks while preserving its comforting essence.
So, why does this recipe work? The secret lies in the combination of softened dates, rich nuts, and a touch of molasses. The dates add natural moisture, ensuring a soft texture, while the nuts provide crunch and contrast. Plus, using simple pantry staples, this recipe for date nut bread with molasses is as easy as it is rewarding.
In the next section, we’ll provide a quick recipe card with all the essentials to get you started. Ready to bake? Let’s dive in!
Quick Recipe Card
Prep Time: 15 minutes
Cook Time: 50 minutes
Total Time: 1 hour 5 minutes
Difficulty Level: Easy
Servings: 8-10 slices
Nutritional Information (Per Serving)
Calories: 230 | Carbs: 38g | Protein: 4g | Fat: 8g
Equipment Needed
- Mixing bowls
- Measuring cups and spoons
- Loaf pan (9×5 inch)
- Whisk or electric mixer
- Cooling rack
Ingredients
- 1 cup (150g) chopped dates
- 1 cup (240ml) boiling water
- 1/2 cup (120g) unsalted butter, softened
- 3/4 cup (150g) brown sugar
- 2 large eggs
- 1/4 cup (60ml) molasses
- 1 3/4 cups (220g) all-purpose flour
- 1 teaspoon baking soda
- 1/2 teaspoon salt
- 1/2 teaspoon cinnamon
- 1/2 cup (60g) chopped nuts (walnuts or pecans)
Instructions
- Preheat oven to 350°F (175°C). Grease a 9×5-inch loaf pan.
- In a bowl, pour boiling water over chopped dates and let them soak for 10 minutes.
- In a large bowl, cream together butter and brown sugar until light and fluffy.
- Beat in eggs one at a time, then mix in molasses.
- In a separate bowl, whisk together flour, baking soda, salt, and cinnamon.
- Gradually add dry ingredients to wet ingredients, mixing until just combined.
- Fold in softened dates and chopped nuts.
- Pour batter into prepared loaf pan and bake for 50 minutes or until a toothpick inserted in the center comes out clean.
- Let the date and nut bread recipe cool in the pan for 10 minutes before transferring to a wire rack to cool completely.
- Enjoy this delightful recipe date nut loaf, perfect for breakfast or an afternoon snack!
INGREDIENT DEEP DIVE

Key Ingredients Explained
- Dates:
- Role: The star of our date bread recipe, dates provide natural sweetness and moisture. They are rich in fiber, antioxidants, and essential minerals like potassium and magnesium.
- Substitution Options: If you don’t have dates on hand, you can substitute with dried figs or raisins, but the flavor profile will change slightly.
- Brand Recommendations: Look for Medjool dates for their rich flavor and soft texture. Brands like Natural Delights or Sun-Maid offer high-quality options.
- Nuts (Walnuts or Pecans):
- Role: Nuts add a delightful crunch and nutty flavor that complements the sweetness of the dates. They also provide healthy fats and protein.
- Substitution Options: You can use almonds or hazelnuts if you prefer a different taste.
- Storage Tips: Store nuts in an airtight container in a cool, dark place to maintain freshness.
- Molasses:
- Role: This ingredient adds depth of flavor and moisture to the bread. It enhances the sweetness while providing iron and calcium.
- Substitution Options: If you don’t have molasses, honey or maple syrup can be used, but they will alter the taste slightly.
- Temperature Requirements: Molasses should be stored at room temperature in a sealed container.
- Flour:
- Role: All-purpose flour serves as the base for our loaf, providing structure.
- Substitution Options: For a gluten-free version, consider using almond flour or a gluten-free all-purpose blend.
- Storage Tips: Keep flour in a cool, dry place in an airtight container to prevent spoilage.
- Buttermilk:
- Role: Buttermilk contributes to the bread’s tenderness and adds a slight tanginess that balances the sweetness of the dates.
- Substitution Options: You can make a quick substitute by mixing regular milk with a tablespoon of vinegar or lemon juice.
- Temperature Requirements: Use buttermilk at room temperature for best results.
Why This Recipe Works
The combination of these ingredients creates a moist, flavorful loaf that is both satisfying and nutritious. The dates provide natural sweetness, while the nuts offer texture and healthy fats. The molasses adds richness, making this bread not only delicious but also a wholesome choice for breakfast or snacks.
EQUIPMENT NEEDED
Essential Tools
To make this date bread recipe successfully, you’ll need a few essential tools:
- Mixing Bowl: A large mixing bowl is crucial for combining your dry and wet ingredients effectively when preparing your recipe for date nut bread with molasses.
- Loaf Pan: A standard 9×5 inch loaf pan is ideal for shaping your date nut bread. This size ensures even baking and helps achieve that perfect loaf.
- Measuring Cups and Spoons: Accurate measurements are key to achieving the perfect texture and flavor in your date and nut bread recipe.
- Wooden Spoon or Spatula: Use these for mixing the batter without overworking it, which helps maintain a tender loaf in your date bread recipe.
- Oven: A reliable oven is essential for baking your date bread evenly.
Alternative Options
If you don’t have all the specific tools, here are some alternatives:
- Mixing Bowl: Any large bowl will work, including glass or stainless steel.
- Loaf Pan: You can use a round cake pan, but adjust the baking time accordingly to ensure it cooks through.
- Measuring Tools: If you don’t have measuring cups, a kitchen scale can be used for precise measurements in your recipe date nut loaf.
Care and Maintenance Tips
To ensure your equipment lasts:
- Loaf Pan: Grease it well before use to prevent sticking when making your date nut bread. Clean with warm soapy water and avoid abrasive scrubbers that can scratch the surface.
- Mixing Bowl: If using glass or metal, ensure it’s free of any grease before mixing to prevent clumping in your batter.
- Measuring Tools: Wash them after each use to maintain accuracy and hygiene.
Budget vs. Premium Options
While you can find budget-friendly options for baking equipment, investing in quality tools can enhance your baking experience:
- Budget Options: Look for basic non-stick loaf pans and plastic measuring cups at discount stores that can work well for your date bread recipe.
- Premium Options: Brands like USA Pan offer durable, high-quality bakeware that provides excellent heat distribution and longevity for consistent results in all your baking endeavors.
This section ensures you have everything you need to create the perfect loaf of date bread without any hassle.
STEP-BY-STEP INSTRUCTIONS

Creating a delicious loaf of date bread is straightforward when you follow these detailed steps. This date bread recipe is designed to be easy to follow, ensuring you achieve a perfect loaf every time.
Step 1: Preheat the Oven
Preheat your oven to 350°F (175°C). This is crucial for ensuring even baking of your date nut bread.
Step 2: Prepare Your Loaf Pan
Grease your 9×5 inch loaf pan thoroughly. This will prevent the bread from sticking and make it easier to remove after baking.
Step 3: Mix Dry Ingredients
In a large mixing bowl, combine:
- 2 cups all-purpose flour
- 1 teaspoon baking soda
- 1/2 teaspoon salt
Whisk these ingredients together until well blended. This step is essential for ensuring even distribution of the leavening agent in your recipe date nut loaf.
Step 4: Combine Wet Ingredients
In another bowl, mix together:
- 1 cup pitted dates, chopped
- 1/2 cup walnuts or pecans, chopped
- 1/2 cup brown sugar
- 1/4 cup molasses
- 1/2 cup buttermilk
- 1 large egg
Stir until the mixture is smooth and well combined. The dates will add natural sweetness to your date and nut bread recipe, while the molasses contributes a rich flavor.
Step 5: Combine Wet and Dry Mixtures
Combine Mixtures: Slowly incorporate the wet mixture into the dry ingredients, stirring gently until just combined. Avoid overmixing, as this can result in a dense loaf in your date bread recipe.
Step 6: Fold in Dates and Nuts
Gently fold in the chopped dates and nuts. This step ensures that every slice of your recipe for date nut bread with molasses is packed with flavor and texture.
Step 7: Pour into Pan
Pour the batter into your prepared loaf pan, smoothing the top with a spatula. This helps create an even surface for baking.
Step 8: Bake
Bake the Loaf: Place the loaf pan in the preheated oven and bake for approximately 60 minutes. To check for doneness, insert a toothpick into the center; it should come out clean or with a few moist crumbs.
Step 9: Cool Before Slicing
Cool the Bread: After baking, take the loaf out of the oven and let it cool in the pan for about 10 minutes. Then, move it to a wire rack to cool completely. Allowing it to cool properly will enhance the flavors of your date nut bread.
Common Pitfalls and How to Avoid Them
- Overmixing: This can lead to a tough loaf. Mix until just combined.
- Not Checking Oven Temperature: Ensure your oven is calibrated correctly; an oven thermometer can help.
- Skipping Cooling Time: Cutting into warm bread can lead to a gummy texture.
Visual Cues for Each Stage
- Batter Consistency: The batter should be thick but pourable.
- Loaf Color: It should be golden brown when done.
Timing Tips
Keep an eye on your bread during the last few minutes of baking. Ovens can vary, so start checking for doneness at around 50 minutes.
Technique Explanations
Using room temperature ingredients helps create a smooth batter that rises well. Incorporating air while mixing also aids in achieving a light texture in your date bread recipe.
EXPERT TIPS AND TRICKS
To elevate your date bread recipe and ensure perfect results, consider these expert tips and tricks:
Professional Baker Insights
- Choose Quality Ingredients: The quality of your dates can significantly impact the flavor of your date nut bread. Opt for plump, fresh Medjool dates for the best taste.
- Room Temperature Ingredients: Using room temperature eggs and buttermilk helps create a smoother batter, allowing for better incorporation of air, which is crucial for a light loaf.
Troubleshooting Common Issues
- Dense Bread: If your bread turns out dense, it may be due to overmixing the batter. Remember to mix until just combined.
- Dry Loaf: Ensure that you are measuring your flour correctly. Spoon flour into the measuring cup rather than scooping directly to avoid packing it down.
Make-Ahead Instructions
You can prepare the batter in advance and store it in the refrigerator for up to 24 hours before baking. This can enhance the flavors in your recipe date nut loaf as the ingredients have more time to meld together.
Storage Guidelines
- Room Temperature: Once cooled, store your date and nut bread recipe in an airtight container at room temperature for up to 3 days.
- Refrigeration: For longer storage, wrap the loaf tightly in plastic wrap and refrigerate for up to a week.
- Freezing: You can freeze slices or the whole loaf. Wrap it well in plastic wrap and then in aluminum foil. It can be frozen for up to 3 months. Thaw at room temperature before serving.
Additional Tips
- Add Spices: Consider adding cinnamon or nutmeg to your batter for an extra layer of flavor that complements the sweetness of the dates.
- Experiment with Mix-Ins: Feel free to customize your recipe for date nut bread with molasses by adding chocolate chips or dried fruits like cranberries for added texture and taste.
By following these expert tips, you’ll enhance your baking skills and ensure that every loaf of date bread is a delicious success!
VARIATIONS AND CUSTOMIZATIONS
One of the best aspects of this date bread recipe is its versatility. Here are some creative variations and customizations to suit your taste preferences or dietary needs:
Seasonal Adaptations
- Autumn Spice: Add a teaspoon of pumpkin spice or cinnamon to your batter for a warm, seasonal flavor that pairs beautifully with the sweetness of the dates.
- Holiday Twist: Incorporate chopped dried cranberries or orange zest for a festive touch during the holiday season.
Dietary Modifications
- Gluten-Free Option: Substitute all-purpose flour with a gluten-free flour blend. Make sure to include a binding agent like xanthan gum if your blend doesn’t contain it.
- Vegan Version: Replace the egg with a flaxseed meal (1 tablespoon of flaxseed mixed with 2.5 tablespoons of water, let it sit until gel-like) and use plant-based milk instead of buttermilk. You can also substitute molasses with agave syrup for sweetness.
Flavor Variations
- Nut Choices: While walnuts and pecans are traditional, you can experiment with other nuts such as almonds or hazelnuts for a different flavor profile.
- Chocolate Lovers: Add 1/2 cup of chocolate chips to the batter for a decadent twist on your date nut bread. The chocolate complements the sweetness of the dates perfectly.
Decoration Ideas
- Toppings: Before baking, sprinkle the top of your loaf with oats or chopped nuts for added texture and visual appeal.
- Glaze: Drizzle a simple glaze made from powdered sugar and milk over the cooled loaf for an elegant finish.
These variations allow you to personalize your date and nut bread recipe, making it uniquely yours while still enjoying the deliciousness of this classic loaf.
SERVING AND PRESENTATION

Presenting your date bread recipe beautifully can enhance the overall experience of enjoying this delicious loaf. Here are some serving suggestions and presentation tips:
Plating Suggestions
- Slice with Care: Use a serrated knife to slice your date nut bread. This will help maintain the integrity of each slice, showcasing the beautiful chunks of dates and nuts.
- Serve Warm or Room Temperature: While this bread is delightful served warm, it’s also delicious at room temperature. Consider warming individual slices in the microwave for a few seconds before serving.
Accompaniment Recommendations
- Spread Options: Enhance each slice with a spread of butter, cream cheese, or even a dollop of mascarpone. The creamy textures complement the sweet and nutty flavors of the bread.
- Pair with Beverages: This bread pairs wonderfully with a cup of coffee or tea. For a more indulgent option, serve it alongside a glass of milk or a warm chai latte.
Special Occasion Presentations
- Gift Idea: Wrap your cooled loaf in parchment paper and tie it with twine for a rustic gift. Include a tag with the recipe to share the joy of baking.
- Brunch Table Highlight: Place the loaf on a wooden cutting board at a brunch gathering. Surround it with fresh fruit, such as sliced apples or berries, for a colorful display.
Photography Tips for Social Sharing
- Natural Light: When photographing your recipe date nut loaf, use natural light to capture its texture and color. Avoid harsh overhead lighting that can create shadows.
- Angles Matter: Experiment with different angles; a top-down view can showcase the loaf’s shape, while a side view can highlight its texture and layers.
- Props and Backgrounds: Use simple props like fresh ingredients or rustic kitchenware to create an inviting scene that enhances your bread’s appeal.
Pairing Suggestions
For an extra special treat, consider pairing your date and nut bread recipe with:
- A fruit compote or jam
- A side of yogurt topped with honey
- A sprinkle of powdered sugar for added sweetness
By following these serving and presentation tips, you’ll not only enjoy your delicious date bread but also impress your family and friends with its beautiful appearance!
CONCLUSION
In conclusion, this date bread recipe is not only easy to make but also a delightful way to enjoy the natural sweetness of dates combined with the crunch of nuts. Whether you’re baking it for a special occasion, a cozy breakfast, or simply to indulge in a homemade treat, this recipe for date nut bread with molasses is sure to impress.
The versatility of this date nut bread allows for countless variations, whether you choose to add spices, substitute ingredients for dietary needs, or experiment with different nuts and flavors. Each loaf you create can be uniquely yours, making it a perfect addition to any kitchen.
By following the detailed steps and expert tips provided in this article, you’ll be well on your way to mastering this classic recipe. So gather your ingredients and get ready to bake a delicious loaf of date and nut bread that will fill your home with warmth and inviting aromas. Enjoy every slice knowing that you’ve created something truly special! Please review this conclusion and let me know if you’d like any changes or if there’s anything else you need!
FAQ SECTION
1. What makes this date bread recipe special?
This date bread recipe stands out due to its combination of natural sweetness from dates and the nutty flavor of walnuts or pecans. The addition of molasses enhances the richness, making it a delightful treat for any occasion.
2. Can I substitute fresh dates for dried dates in this recipe?
While dried dates are typically used in this recipe for date nut bread with molasses, you can use fresh dates if you adjust the moisture content slightly. Fresh dates are juicier, so consider reducing other liquid ingredients to maintain the right batter consistency.
3. How should I store my date nut bread?
To store your date and nut bread recipe, keep it in an airtight container at room temperature for up to 3 days. For longer storage, wrap it tightly and refrigerate or freeze it for up to 3 months.
4. Can I make this bread gluten-free?
Yes! You can easily adapt this recipe date nut loaf by using a gluten-free flour blend. Make sure to include a binding agent like xanthan gum if your blend doesn’t contain it, as this will help achieve the right texture.
5. How do I know when my date bread is done baking?
Your date nut bread is done when a toothpick inserted into the center comes out clean or with a few moist crumbs. The top should be golden brown and spring back slightly when touched.
6. Can I add other ingredients to this recipe?
Absolutely! Feel free to customize your date bread recipe by adding ingredients like chocolate chips, spices (such as cinnamon), or different nuts based on your preferences.
7. Is this bread suitable for freezing?
Yes, you can freeze your recipe for date nut bread with molasses! Wrap it tightly in plastic wrap and then in aluminum foil before placing it in the freezer. Thaw at room temperature when you’re ready to enjoy it. This FAQ section addresses common questions while incorporating the specified keywords effectively.