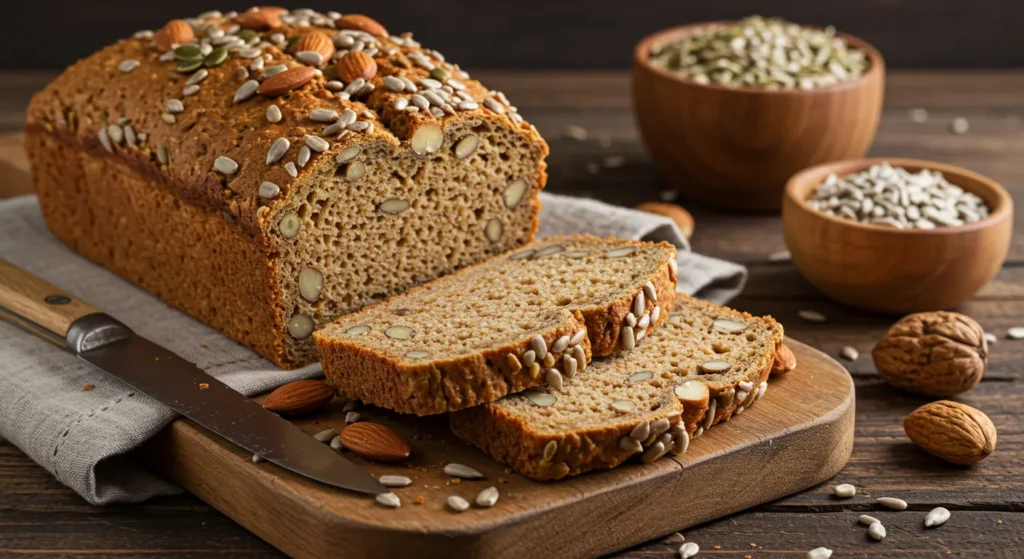
Looking to boost your daily protein intake without sacrificing taste or convenience? This high protein bread recipe is here to save the day! Packed with nutritious ingredients and designed for busy lifestyles, this bread is perfect for sandwiches, toast, or even snacking. Whether you’re a fitness enthusiast, health-conscious baker, or just someone who loves wholesome homemade goodies, this protein bread recipe is sure to become a staple in your kitchen.
What makes this high protein bread so special is its simplicity. Using protein flour or other protein-rich ingredients, you can bake a loaf that’s not only delicious but also supports your dietary goals. With minimal prep time and straightforward steps, this recipe proves that adding more protein in bread doesn’t have to be complicated. Best of all, it’s versatile enough to suit any meal—breakfast, lunch, or dinner.
Whether you’re pairing it with avocado, peanut butter, or your favorite sandwich fillings, this high protein bread recipe delivers on flavor, nutrition, and ease. Ready to bake a loaf that’s as healthy as it is satisfying? Let’s dive in!
Quick Recipe Card
Prep Time: 10 minutes
Cook Time: 5 minutes (plus baking time)
Total Time: 1 hour (including rising and baking)
Difficulty: Easy
Servings: 1 loaf (8-10 slices)
Nutritional Information (per slice):
Calories: 120 | Protein: 10g | Fat: 3g | Carbs: 15g | Fiber: 4g
Key Equipment:
- Mixing bowls
- Whisk and spatula
- Loaf pan (9×5 inches)
- Measuring cups and spoons
- Parchment paper or nonstick cooking spray
Ingredients:
- 1 cup protein flour (or a blend of almond flour and oat flour)
- 1 cup whole wheat flour (or all-purpose flour for a lighter texture)
- 2 tbsp ground flaxseed (for extra protein and fiber)
- 1 packet (2 ¼ tsp) active dry yeast
- 1 tsp salt
- 1 tbsp honey or maple syrup
- 1 cup warm water (110°F/45°C)
- 2 tbsp olive oil or melted butter

This quick guide ensures you can whip up a loaf of high protein bread effortlessly. With these simple ingredients, you’re ready to bake one of the best protein bread recipes around!
Step-by-Step Instructions
Baking high protein bread is as easy as mixing, rising, and baking. Follow these five simple steps to create a loaf that’s wholesome, flavorful, and packed with protein.
Step 1: Activate the Yeast
In a small bowl, combine the warm water, honey (or maple syrup), and yeast. Stir gently and let the mixture sit for 5-10 minutes until it becomes frothy. This step ensures the yeast is active and ready to help your bread rise. For best results, make sure the water is warm but not too hot—around 110°F (45°C).
Step 2: Mix the Dry Ingredients
In a large mixing bowl, whisk together the protein flour , whole wheat flour, ground flaxseed, and salt. Using protein flour or a blend of high-protein ingredients like almond flour ensures your bread is nutrient-dense. The flaxseed adds extra fiber and helps bind the dough.
Step 3: Combine Wet and Dry Ingredients
Add the activated yeast mixture and olive oil (or melted butter) to the dry ingredients. Stir until a dough begins to form. If the dough feels too sticky, add a tablespoon of flour at a time until it comes together. Knead the dough lightly in the bowl for 2-3 minutes to develop structure.
Step 4: Let the Dough Rise
Transfer the dough to a greased loaf pan lined with parchment paper or lightly coated with nonstick spray. Cover the pan with a clean kitchen towel or plastic wrap and let the dough rise in a warm, draft-free area for 30-45 minutes, or until it has doubled in size. This step ensures your high protein bread will be light and airy.
Step 5: Bake to Perfection
Preheat your oven to 375°F (190°C). Once the dough has risen, bake the loaf for 25-30 minutes, or until the top is golden brown and sounds hollow when tapped. To ensure it’s fully baked, insert a toothpick into the center—it should come out clean. Let the bread cool in the pan for 10 minutes before transferring it to a wire rack to cool completely. Slicing while warm can make the texture gummy, so patience is key!
Expert Tips & Troubleshooting

Baking high protein bread can sometimes present unique challenges, but with these expert tips, you’ll be well-equipped to handle any hiccups along the way.
Professional Baker Insights:
- Choose the Right Protein Flour: If you’re using a specialty protein flour , ensure it’s finely ground for the best texture. Almond flour, oat flour, or blends specifically designed for baking work beautifully.
- Boost the Protein Content: For an extra protein boost, add ingredients like whey protein powder, hemp seeds, or chia seeds to the dough. These additions not only enhance nutrition but also add texture and flavor.
- Don’t Skip the Flaxseed: Ground flaxseed acts as a natural binder and adds fiber and omega-3s. It’s a key ingredient for achieving the right consistency in this protein bread recipe .
Troubleshooting Common Issues:
- Dense Bread: Dense loaves often result from insufficient rising time or inactive yeast. Make sure your yeast is fresh, and let the dough rise in a warm, draft-free area until doubled in size.
- Dry Texture: Overbaking or using too much flour can lead to dry bread. Measure your ingredients carefully and avoid overmixing. Adding a tablespoon of olive oil or butter helps keep the loaf moist.
- Sticky Dough: If the dough feels too sticky, resist the urge to add excessive flour. Instead, lightly oil your hands and knead the dough briefly to bring it together.
Make-Ahead Instructions:
You can prepare the dough up to 24 hours in advance and store it in the refrigerator. Allow it to come to room temperature before letting it rise and baking. Alternatively, bake the bread, let it cool completely, and freeze slices individually in plastic wrap and foil for up to 3 months.
Storage Guidelines:
Store cooled bread in an airtight container at room temperature for up to 3 days. For longer storage, refrigerate for up to a week or freeze slices for up to 3 months. Reheat in the toaster or oven for that fresh-baked feel.
With these tips, you’ll master the art of baking high protein bread like a pro!
Variations & Customizations
One of the best things about this high protein bread recipe is its versatility. Whether you’re catering to dietary restrictions or looking to experiment with flavors, these customizations will keep your baking exciting and unique.
Dietary Modifications:
- Gluten-Free Option: Substitute the whole wheat flour with a gluten-free flour blend and ensure your protein flour is certified gluten-free. This ensures your high protein bread is safe for those with gluten sensitivities.
- Vegan Option: Replace the honey with maple syrup and use plant-based butter or olive oil. These swaps make this recipe completely vegan without sacrificing texture or flavor.
- Low-Carb Option: Use almond flour or coconut flour as the base and add a sugar substitute like stevia or erythritol for sweetness. This version is perfect for keto or low-carb diets.
Flavor Variations:
- Herb and Garlic Bread: Add dried herbs like rosemary, thyme, or oregano, along with minced garlic, for a savory twist. This variation pairs beautifully with soups or as a sandwich base.
- Sweet Cinnamon Raisin Bread: Stir in cinnamon, raisins, and a touch of sweetener for a breakfast-friendly loaf. Spread it with almond butter or cream cheese for an indulgent treat.
- Nutty Delight: Fold in chopped nuts like walnuts, pecans, or almonds for added crunch and healthy fats. This makes the bread even more satisfying and nutrient-dense.
Decoration Ideas:
- Sprinkle sesame seeds, poppy seeds, or oats on top before baking for added texture and visual appeal.
- Drizzle melted dark chocolate or nut butter over the cooled loaf for a gourmet touch.
- Serve slices topped with avocado, smoked salmon, or hummus for an elegant appetizer presentation.
With these variations, your high protein bread can suit any occasion, diet, or taste preference—ensuring there’s something for everyone to enjoy!
Serving & Presentation

The way you serve and present your high protein bread can transform it from a simple homemade loaf into a versatile centerpiece for any meal. Whether you’re enjoying it at home or bringing it to a gathering, here are some creative ideas to make it shine.
Plating Suggestions:
- Slice with Precision: Use a sharp serrated knife to cut even slices, ensuring each piece showcases the bread’s texture and density. Arrange the slices neatly on a platter for an elegant presentation.
- Pull-Apart Style: Cut slits into the loaf before baking (without slicing all the way through) to create a pull-apart effect. This makes it easy for guests to grab a piece and adds a rustic charm.
- Bread Board Display: Place the whole loaf on a wooden cutting board surrounded by complementary spreads like hummus, guacamole, or nut butter. The combination of textures and flavors is irresistible.
Accompaniment Recommendations:
- Pair the bread with soups, salads, or pasta dishes for a complete, protein-packed meal.
- Serve it alongside charcuterie boards featuring cured meats, cheeses, and olives for a sophisticated appetizer spread.
- For a casual snack, enjoy it with a side of creamy almond butter, peanut butter, or smashed avocado.
Special Occasion Presentations:
- Holiday Feasts: Add festive touches like cranberry-infused spreads or rosemary sprigs for decoration during the holidays.
- Breakfast Buffet: Slice the bread and toast it lightly, then arrange it on a tiered stand with toppings like honey, jam, or fresh fruit for a brunch-worthy display.
- Gift Idea: Wrap the cooled loaf in parchment paper, tie it with twine, and attach a handwritten note with serving suggestions for a thoughtful homemade gift.
No matter how you choose to serve it, this high protein bread is sure to be a crowd-pleaser. Its wholesome ingredients, nutrient-dense profile, and endless customization options make it a versatile addition to any setting.
Conclusion
There you have it—the ultimate guide to baking high protein bread , a wholesome and versatile loaf that’s perfect for any occasion. With its nutrient-dense ingredients, satisfying texture, and endless customization options, this bread is a game-changer for health-conscious bakers and busy families alike. Whether you’re whipping up a batch for breakfast, meal prep, or gifting, this protein bread recipe is sure to become a staple in your kitchen.
What makes this high protein bread so special is its balance of simplicity and nutrition. Using protein flour and other high-protein ingredients ensures every slice supports your dietary goals without compromising on flavor. Best of all, it’s easy enough for bakers of all skill levels to master. So grab your ingredients, preheat that oven, and get ready to bake a loaf that will fuel your body and delight your taste buds.
Happy baking, and may every slice bring energy and joy to your day—just like a perfectly baked, protein-packed bread should!
FAQ Section
1. Can I use all-purpose flour instead of protein flour?
Yes, you can substitute protein flour with all-purpose flour, but the protein content will be lower. To boost protein, consider adding ingredients like whey powder, flaxseed, or almond meal.
2. What can I substitute for flaxseed?
If you don’t have flaxseed, you can use chia seeds or psyllium husk as a binding agent. Both options add fiber and help maintain the structure of the bread.
3. Why didn’t my bread rise?
If your bread didn’t rise, it could be due to inactive yeast, water that’s too hot (which kills the yeast), or insufficient rising time. Make sure your yeast is fresh and the water is warm but not scalding.
4. Can I freeze the bread?
Absolutely! You can freeze the entire loaf or individual slices in plastic wrap and foil for up to 3 months. Thaw at room temperature or toast directly from frozen for convenience.
5. How do I store leftovers?
Store cooled bread in an airtight container at room temperature for up to 3 days. For longer storage, refrigerate for up to a week or freeze slices for up to 3 months. Reheat in the toaster or oven for that fresh-baked feel.
6. Can I make this bread without yeast?
Yes, you can use baking powder or baking soda as a leavening agent for a quicker, yeast-free version. However, the texture will be denser compared to traditional yeast-risen bread.
7. What spreads pair well with this bread?
This high protein bread pairs beautifully with avocado, nut butter, hummus, cream cheese, or smashed banana. Get creative and let your taste buds guide you!