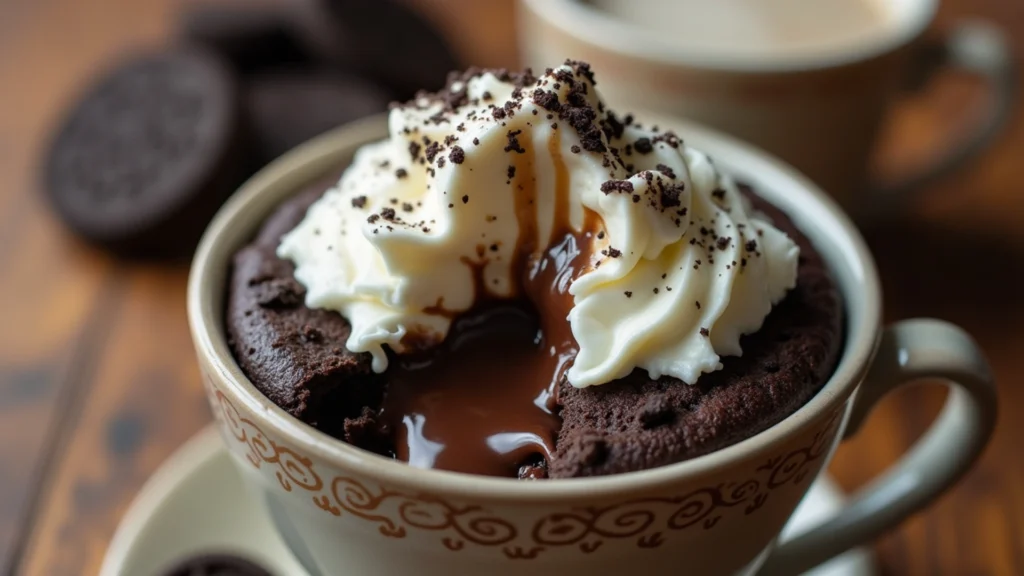
Ever craved a sweet treat but didn’t want to bake a whole cake? The Oreo Mug Cake recipe is here to save the day. It’s quick, easy, and irresistible, perfect for those sweet moments.
Key Takeaways
- Oreo Mug Cake is a single-serve dessert that can be made in just minutes in the microwave.
- The recipe requires only a few simple ingredients like Oreos, milk, and baking powder.making
- It’s a great way to satisfy sweet cravings without the hassle of baking a full-sized cake.
- The mug cake can be customized with different Oreo flavors and toppings.
- Preparation and cooking time take less than 5 minutes, making it a convenient dessert option.
Understanding the Magic of Oreo Mug Cakes
Oreo mug cakes are a favorite quick snack and mug treat for dessert lovers. They are easy to make and very satisfying. The magic happens in the microwave.
Why Mug Cakes Are Perfect Single-Serve Desserts
Mug cakes are perfect for sudden oreo cookies cravings. They can be made in just a few minutes, making them a great quick snack for one. They don’t have eggs to avoid a spongy texture. Baking powder adds the needed lift for a dense and fudgy microwave recipe.
The Science Behind Microwave Baking
The magic of microwave baking is in the fast heating of water molecules. This quick heating creates steam. The steam helps the mug treat rise and get its unique texture. The Oreo cookies add rich chocolate flavor and crunchy texture, making the dessert delightful.
Oreo mug cakes are simple and convenient, making them very popular. They are often shared on TikTok. With just a few ingredients and short cooking time, they are a quick way to satisfy sweet cravings without the trouble of traditional baking.
Essential Ingredients for Your Oreo Mug Cake Recipe
With just a handful of ingredients, creating a delicious Oreo mug cake is a breeze. The main ingredients are Oreo cookies and milk. The Oreo cookies provide a rich chocolate flavor and sweetness. Milk helps mix everything together.
You’ll also need some basic baking items:
- Granulated sugar (2 teaspoons)
- All-purpose flour (1 tablespoon)
- Baking powder (1/2 teaspoon)
- Unsweetened cocoa powder (2 teaspoons)
- A pinch of kosher salt
The recipe uses 6 Oreo cookies for the right mix of flavors and textures. Sugar, flour, baking powder, and cocoa powder make the cake light and fluffy, while a pinch of salt enhances the taste.
With these simple ingredients, you can make a delicious Oreo mug cake quickly. Now, let’s look at how to make this easy dessert step by step!
Kitchen Tools and Equipment Needed
To make the perfect Oreo mug treat, you’ll need a few basic kitchen tools. First, you’ll need a microwave-safe mug. It should be between 10 to 16 ounces to avoid overflow. A wider, shallower mug is also good for even cooking.
Choosing the Right Mug Size
The mug size is key for a successful Oreo mug cake. A mug that’s too small can overflow, while a too-large mug may not bake evenly. A 12-ounce mug is the best size for great results.
Additional Helpful Tools
- A blender or food processor to crush the Oreo cookies into a fine crumb.
- A mini whisk or fork for mixing the batter ingredients together.
- Measuring spoons to ensure accurate measurements of the recipe ingredients.
- A small spatula to help transfer the mug cake from the mug to a plate or bowl.
With these simple tools, you’re ready to make a tasty and easy microwave recipe for your mug treat.
| Item | Quantity |
|---|---|
| Microwave-safe Mug | 1 (10-16 oz) |
| Blender or Food Processor | 1 |
| Mini Whisk or Fork | 1 |
| Measuring Spoons | 1 set |
| Small Spatula | 1 |
Step-by-Step Preparation Guide
Making the perfect Oreo mug cake is easy and fun. It’s great for a quick, easy dessert or a sweet treat from the microwave. This Oreo mug cake recipe will quickly become your favorite.
- First, get your ingredients ready: crushed Oreo cookies, sugar, flour, baking powder, butter, milk, and vanilla extract. Make sure to measure each one right to get the flavors just right.
- Then, mix the dry ingredients – crushed Oreos, sugar, flour, and baking powder – until they’re well combined.
- Next, melt the butter in a microwave-safe mug for 30-40 seconds. After it’s melted, add the milk and vanilla extract. Stir until everything is mixed well.
- combine the dry ingredients with the wet ingredients in the mug. Use a fork or small whisk to mix until the batter is smooth and without lumps.
- Put the Oreo mug cake in the microwave on high for 60-80 seconds. It should be set and puffed up. Don’t overcook it, as it will firm up more as it cools.
- Let the cake rest for a few minutes after cooking to enhance its texture.
With just a few ingredients and a quick microwave trip, you can have a delicious, easy dessert. The Oreo mug cake recipe is quick, easy, and perfect for satisfying your sweet tooth.
“The Oreo mug cake is the perfect solution for when you want a quick, indulgent dessert without the hassle of a full-size cake. It’s rich, chocolatey, and incredibly easy to make – what’s not to love?”
Mixing Techniques for the Perfect Texture
Making the perfect oreo cookies mug treat is all about mastering mixing techniques. Start by finely crushing the oreo cookies with a blender, food processor, or a zip-top bag and rolling pin. This ensures a fine, consistent crumb that blends well into the batter.
Crushing Oreos Properly
For the best results, crush the oreo cookies into a fine powder with a mini food processor or blender. Or, crush the Oreos by placing them in a zip-top bag and using a rolling pin. Make sure not to over-crush, as you want some crunchy bits in your easy dessert.
Combining Wet and Dry Ingredients
After crushing the oreo cookies, mix the wet and dry ingredients. Combine the crushed cookies with milk or non-dairy milk until smooth. Avoid overmixing to prevent a tough mug treat. The batter should be dark brown when the oreos and milk are fully mixed.
To add a light and airy texture, consider adding a pinch of baking powder. But be careful not to use too much, as it can make the taste bitter. The goal is to find the right balance for your mug cake texture.
Microwave Cooking Tips and Timing
Making a tasty Oreo mug cake in the microwave is all about timing and temperature. To get a moist and fluffy cake, you need to know how microwaves work.
Begin by microwaving your cake for 60 seconds. Watch it closely because different microwaves cook at different rates. If your microwave is very powerful, you might need to cook it for less time.
- Check the cake at the 30-second mark. If it’s still too runny, heat it for another 15-30 seconds.
- The cake is ready when the top feels spongy and firm. Don’t overcook it, or it will be dry and hard.
- Let the cake cool for a minute before eating. This helps avoid burns.
Getting the perfect Oreo mug cake takes practice and adjusting the cooking time. Soon, you’ll be making these tasty treats easily!
| Ingredient | Quantity |
|---|---|
| Milk | 1/4 cup |
| Oreos | 5 pieces |
| All-purpose Flour | 1 tbsp |
| Unsweetened Cocoa Powder | 1 tsp |
| Granulated Sugar | 1/2 tbsp |
| Baking Powder | 1/4 tsp |
| Vanilla Extract | 1/2 tsp |

With these easy tips and a few ingredients, you can make a delicious Oreo mug cake quickly. It’s an ideal choice for a quick snack or dessert. Enjoy the chocolatey flavor whenever you want!
Creative Toppings and Garnishes
Make your Oreo mug cake even better with creative toppings and garnishes. Try whipped cream, extra sweet treats, and more. These ideas can turn a simple dessert into a special treat.

Whipped Cream Options
Whipped cream is a classic choice that pairs well with the Oreo mug cake’s chocolatey taste. You can use store-bought or make your own. Just whip heavy cream with powdered sugar and vanilla until it’s soft and fluffy.
Additional Sweet Additions
- Crushed Oreo cookies on top add a crunchy touch.
- Chocolate or caramel sauce drizzled on increases the sweetness.
- Chocolate chips, nuts, or toasted coconut flakes add texture and look good.
- Adding a scoop of ice cream, like vanilla or chocolate, makes it even more decadent.
- Peanut butter or Nutella swirled in the batter before baking is a creamy surprise.
The Oreo mug cake is a blank canvas for your creativity. Try different toppings and mixes to find your favorite way to enjoy this quick and tasty treat.
Flavor Variations and Substitutions
Get creative with oreo cookies and different ingredients to make your own mug treat. Try using mint, red velvet, or golden Oreos for a new twist on your easy dessert.
Want to make it healthier? You can swap regular milk for almond or oat milk for a dairy-free option. Adding a bit of vanilla extract can also boost the flavor. And, if you don’t have baking powder, you can skip it for a chewier texture.
Want to change up the cookie base? Lotus Biscoff adds a caramelized taste. You can customize your oreo cookies mug cake to match your taste
| Ingredient | Substitution Options |
|---|---|
| Oreo Cookies | Mint, Red Velvet, Golden Oreos, Lotus Biscoff |
| Milk | Almond Milk, Oat Milk |
| Baking Powder | Omit for a gooier texture |
| Vanilla Extract | Add a splash for enhanced flavor |
Explore the world of oreo cookies mug cakes. With these tips, you can make easy dessert wonders that are all your own.

Storage and Reheating Guidelines
The oreo mug cake recipe is best enjoyed right after cooking. But, if you have leftovers, don’t worry! You can still enjoy these treats later.
If you need to store it, use an airtight container, Then, refrigerate it for up to 2-3 days. When you’re ready, reheat it in the microwave for 10-15 seconds. but avoid overheating during reheating, as it may dry out.
Want to save time? Prepare the batter in advance. Store it in the fridge for up to 3 days before cooking. This way, you can have a freshly baked oreo mug cake with little effort.
Remember, to keep your oreo mug cake recipe perfect, handle it with care. Avoid overheating. Enjoy it at its best, whether it’s straight from the microwave or reheated.
Conclusion

The Oreo mug cake is a quick, easy, and delicious oreo mug cake recipe. It satisfies chocolate cravings in minutes. With simple ingredients and minimal prep time, it’s perfect for any time of day.
Whether you’re craving a late-night treat or just want a quick indulgence, this microwave recipe is perfect. It’s sure to hit the spot.
The versatility of the Oreo mug cake lets you try different flavors and toppings. You can go from classic chocolate to creative flavor combinations. Remember to adjust the cooking times for your microwave’s power for the best results.
Enjoy the rich, decadent taste of your homemade Oreo mug cake. Savor the convenience of a quick, satisfying dessert ready in just minutes. Embrace the classic Oreo flavor or explore new and exciting variations. The choice is yours to make this delightful treat your own.
FAQ
What is an Oreo mug cake?
An Oreo mug cake is a small, single-serve chocolate cake. It’s made with crushed Oreos, milk, and a few simple ingredients. It’s quick and easy to make in the microwave.
What are the key ingredients for an Oreo mug cake?
You’ll need crushed Oreo cookies, granulated sugar, and all-purpose flour. Also, baking powder, unsweetened cocoa powder, milk, and a pinch of salt are essential.
What tools are needed to make an Oreo mug cake?
You’ll need a microwave-safe mug and a blender or food processor for crushing Oreos. A mini whisk for mixing and measuring spoons are also necessary. Having a spatula and a mug designed for mug cakes is helpful.
How do you prepare an Oreo mug cake step-by-step?
First, mix the dry ingredients in a bowl. Then, simply mix the wet ingredients directly in the mug, then add the dry ingredients and stir until well combined. Microwave for 60-80 seconds and let it rest before enjoying.
How can you ensure the perfect texture for an Oreo mug cake?
Crush the Oreos finely and mix the wet and dry ingredients well. Avoid overmixing. Adjust the microwave cooking time based on your appliance’s wattage.
How do you store and reheat leftover Oreo mug cakes?
Store leftover Oreo mug cakes in an airtight container in the fridge for 2-3 days. To reheat, microwave for 10-15 seconds. Be careful not to overheat it.
Can you customize the flavors of an Oreo mug cake?
Yes, you can try different Oreo flavors like mint or red velvet. You can also use different milks or add vanilla extract, peanut butter, or Nutella

